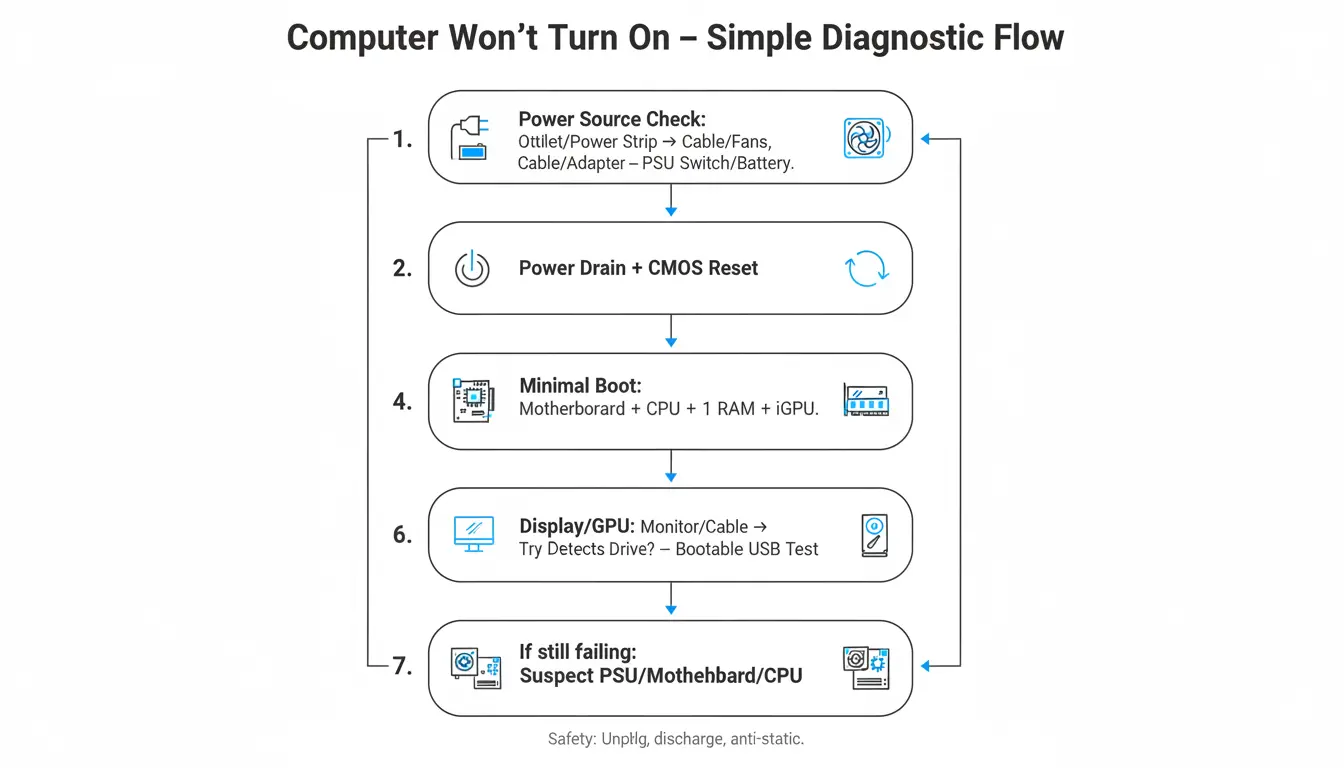

When your computer won’t turn on, it can be frustrating and alarming—especially if you rely on it for work or study. The good news is that most power-on failures can be diagnosed with a simple, structured approach. In this guide, we’ll walk through a clear, step-by-step diagnostic flow that mirrors a flowchart you could sketch on a notepad. You’ll learn how to isolate the root cause, whether it’s a power issue, a hardware fault, or a software/firmware hiccup. This article is designed to be human-readable, actionable, and search-friendly, with clear sections and practical checks you can do at home before seeking professional help.
Step 1: Confirm Power and External Connections
Before diving into the internals, start with the basics.
- Check the wall outlet and power strip: Try a different outlet or temporarily plug in a lamp to confirm it’s working. If you’re using a surge protector, toggle it off and on or bypass it.
- Inspect the power cable: Make sure the cable is fully seated in both the wall and the power supply/adapter. Look for frayed wires or kinks.
- For desktops: Verify the PSU switch is set to “|” (on), and the IEC cable is snug. Some PSUs have a voltage selector—ensure it matches your region.
- For laptops: Confirm the charger’s indicator light is on. If available, test with a known-good charger of the correct wattage.
If there’s no evidence of power (no lights, no fan spin, no screen backlight), the problem is likely in the power delivery chain: outlet, surge protector, power cable/adapter, battery, or the power supply itself.
Step 2: Check Signs of Life
Look for any sign that the system is attempting to power:
- LEDs: Power, charge, or keyboard backlight LEDs indicate partial power.
- Fan behavior: A quick fan twitch suggests the board receives power but may be failing POST.
- Beeps or codes: Many motherboards emit beep codes or display POST codes via a small two-digit LED. Note the pattern; consult your motherboard or system manual.
If you see signs of life but no display, proceed as if it’s a POST or display issue. If there are no signs at all, focus on power components.
Step 3: Perform a Power Drain and CMOS Reset
Transient power states can lock systems in a non-boot condition.
- Laptops: Disconnect charger, remove the battery if it’s removable. Hold the power button for 15–30 seconds to discharge residual power. Reconnect charger (battery still out), then try to power on. Reinstall the battery afterward.
- Desktops: Switch off the PSU and unplug it. Press and hold the power button for 15–30 seconds. Reseat the power cable and try again.
- CMOS/RTC reset: If the system powers but won’t POST, reset BIOS settings. On desktops, remove the CMOS battery for 5–10 minutes or use the CLR_CMOS jumper per the manual. On laptops, check the service manual; some have a pinhole reset or key combo.
A successful power drain or CMOS reset can resolve firmware lockups and misconfigured BIOS settings.
Step 4: Inspect Internal Hardware (Desktops and Some Laptops)
If you’re comfortable opening the case (and warranty allows):
- Reseat essentials: Power off, disconnect power, ground yourself. Reseat RAM modules, GPU, and power connectors (24-pin ATX, 8-pin CPU EPS, GPU PCIe). A loose connector is a common culprit after a move or cleaning.
- Test RAM: Try booting with one stick at a time and in different slots. Faulty memory can prevent POST and mimic power failure.
- Remove peripherals: Disconnect non-essential drives, USB devices, and expansion cards. Try booting with only CPU, one RAM stick, and onboard graphics (if available).
- Check for shorts: Ensure motherboard standoffs are correctly placed and that no stray screw is bridging contacts. Verify front-panel power switch leads are on the correct header pins.
If the system consistently fails to POST with only CPU and RAM, suspect the CPU, motherboard, or PSU.
Step 5: Diagnose the Power Supply (Desktops)
A marginal PSU can deliver partial power but fail under load.
- Paperclip test (basic): With PSU disconnected from the motherboard, short the green PS_ON pin to any black ground using a bent paperclip, then plug in and switch on. The PSU fan should spin. This only indicates a basic “on” condition, not power quality under load.
- Multimeter check: Measure voltages on the 24-pin connector (+3.3V, +5V, +12V rails). Significant deviations indicate a failing PSU.
- Known-good PSU: The most definitive test is swapping in a known-good unit.
If a replacement PSU solves the problem, proceed to a full POST test before reconnecting all drives and peripherals.
Step 6: Isolate Display and GPU Issues
If the system seems to power on but you have no video:
- Monitor and cable: Test with another monitor and a different cable (HDMI/DP). Confirm monitor input source.
- GPU versus iGPU: If your CPU/motherboard has integrated graphics, remove the discrete GPU and connect the monitor to the motherboard video output. If you get video now, the GPU or its power feed may be faulty.
- BIOS graphics settings: After a CMOS reset, default output may change; try each available port.
Artifacts, fan spin-ups with immediate shutdowns, or beep codes can indicate GPU problems.
Step 7: Listen to Beep Codes and Read Status LEDs
Use diagnostic signals to narrow the fault:
- Beep patterns: Common meanings are RAM error (repeating beeps), GPU error (long-short patterns), or CPU/board error. Refer to your system’s manual or vendor support page.
- DRAM/CPU/VGA/BOOT LEDs: Many motherboards cycle these indicators during POST. The LED that stays lit points to the failing stage.
This targeted feedback can save hours of trial and error.
Step 8: Storage and Boot Path Checks
If you reach the vendor logo but fail to boot the OS:
- BIOS detection: Enter BIOS/UEFI and check if the boot drive is listed. Ensure the correct boot order and that the drive mode (AHCI/RAID) is appropriate.
- Cables and power: Reseat SATA data and power cables. For NVMe, ensure the M.2 screw is snug and the drive is fully seated.
- Bootable USB: Test with a known-good bootable USB (Windows PE, Linux live). If it boots, your OS or drive may be corrupted; back up and repair or reinstall.
9: Battery and Charger (Laptops)
- Battery status: If the laptop powers only without the battery or only with it, one of the components is failing. Swollen batteries must be replaced immediately for safety.
- DC jack and power path: Wiggling the DC plug causing intermittent power suggests a loose or damaged DC-in jack or internal power circuitry.
Step 10: Firmware, Microcode, and Updates
- BIOS/UEFI update: If you can POST but experience power-on instability, consider updating to the latest firmware to fix CPU microcode or power initialization bugs.
- Secure Boot/TPM: Misconfigured security settings after a hardware change can block boot. Reset to defaults and reconfigure gradually.
Step 11: When to Suspect the Motherboard or CPU
If you have:
- No POST with minimal config and known-good PSU/RAM
- Correctly seated CPU with no bent pins (for LGA) or damaged pads
- Cleaned and reapplied thermal paste with a working cooler
Then the fault likely lies with the motherboard or CPU. Motherboard failure is more common than CPU failure. Check warranty and consider professional diagnostics.
Safety and Best Practices
- Always disconnect power and discharge before touching internals.
- Use an anti-static wrist strap or touch a grounded metal surface.
- Avoid repeated rapid power cycling; let capacitors discharge 10–15 seconds between attempts.
- Document changes. Only change one variable at a time to keep the diagnostic process clean.
A Text-Only Flowchart You Can Follow
- No power? Check outlet → power strip → cable/adapter → PSU switch → battery/charger.
- Any lights/fans? If no → focus on PSU/adapter/battery. If yes → proceed.
- Power drain + CMOS reset → retry.
- Minimal boot: motherboard + CPU + 1 RAM stick + onboard video → POST?
- If no POST → swap RAM, try other slot → try known-good PSU → inspect CPU/motherboard.
- If POST → add GPU → add drives one by one.
- No display but POST beeps/LEDs OK → test monitor/cable → switch to iGPU → reseat GPU.
- Stuck at logo → check BIOS drive detection → reseat storage → boot from USB → repair OS.
- Persistent failure with known-good parts → suspect motherboard or CPU → service.
Conclusion
A computer that won’t turn on doesn’t have to be a mystery. By following a simple, logical diagnostic sequence—validating power, performing resets, reducing to minimal hardware, and interpreting diagnostic signals—you can pinpoint the issue with confidence. Whether the fix is as simple as a loose cable or as involved as replacing a PSU or motherboard, this structured approach saves time, prevents guesswork, and helps you decide when it’s time to seek professional help.