
For video creators, editors, and marketers, getting the basics of DaVinci Resolve and Final Cut Pro right can make the difference between a smooth post-production workflow and hours of avoidable troubleshooting. Whether you’re setting up your first project or optimizing your export settings for YouTube, Instagram, or broadcast, a methodical approach ensures consistent quality, efficient rendering, and platform-ready delivery. This guide walks you through essential setup, timeline configuration, color management, media optimization, performance tuning, and best-practice export settings in both DaVinci Resolve and Final Cut Pro—so you can produce professional results with confidence.
Project Setup: Start Clean, Stay Consistent
A clean foundation ensures consistent output across edits and revisions.
- Define your delivery platform upfront:
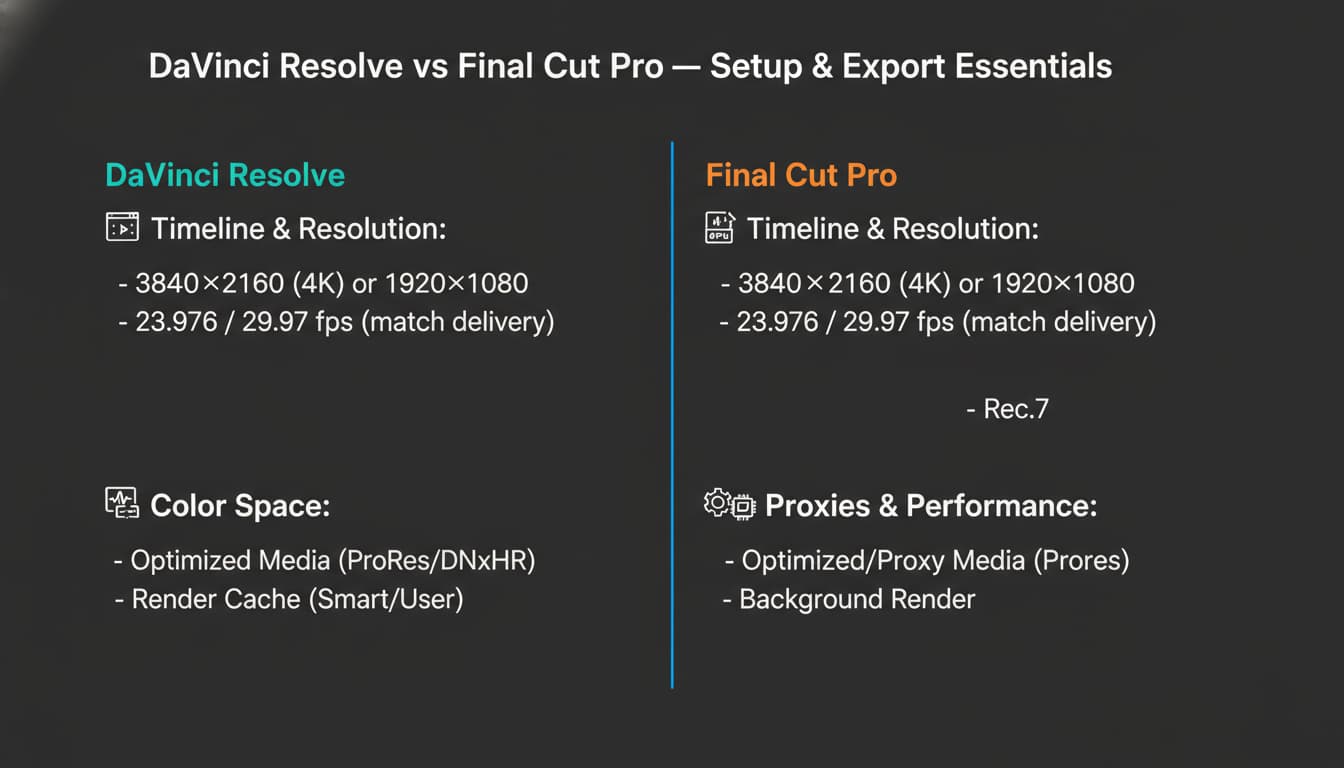
- YouTube: 4K UHD (3840×2160) or 1080p, 23.976/29.97 fps, Rec.709 color space.
- Instagram/TikTok/Reels: 1080×1920 vertical, 24/30/60 fps depending on motion intensity.
- Broadcast: Follow the network’s spec sheet (frame rate, color space, audio loudness).
- Match your timeline frame rate and resolution to your delivery target before importing media to avoid unwanted resampling.
- Organize media:
- Use structured folders for footage, audio, graphics, and exports.
- Maintain naming consistency for easy relinking and versioning.
DaVinci Resolve: Essential Configuration
DaVinci Resolve excels at color management, advanced grading, and scalable workflows. Before editing:
- Project Settings:
- Master Settings: Set Timeline Resolution (e.g., 3840×2160), Timeline Frame Rate (e.g., 23.976 or 29.97), Video Monitoring to match your display if you use an I/O device.
- Color Management:
- Basic workflow: DaVinci YRGB + Timeline color space Rec.709 Gamma 2.4 for standard deliveries.
- Managed workflow: DaVinci YRGB Color Managed, Output Color Space Rec.709 Gamma 2.4; set Input Color Space automatically or per clip.
- Optimized Media and Proxies:
- Generate Optimized Media using ProRes 422 or DNxHR HQ (platform dependent) for smoother editing.
- Use Proxy Media (ProRes Proxy or DNxHR LB) for lightweight performance on laptops.
- Performance Options:
- Enable Smart Cache; set cache format to a mezzanine codec (ProRes/DNxHR).
- Turn on “Use GPU for Blackmagic RAW decode” if applicable; ensure CUDA/Metal is selected based on GPU.
- Audio Setup:
- Set project sample rate to 48 kHz.
- Normalize dialogue tracks around -23 to -18 LUFS integrated for web or meet platform loudness specs as required.
- Color Page Tips:
- Use nodes (serial/parallel) methodically: primary balance, contrast, saturation, skin tones, then look/creative nodes.
- Leverage scopes (Waveform, Parade, Vectorscope) for objective balancing.
- Deliver Page Presets:
- YouTube: H.264 or H.265, 10–20 Mbps for 1080p, 35–60 Mbps for 4K; AAC audio 320 kbps, 48 kHz.
- Master: ProRes 422 HQ or DNxHR HQX for archiving or round-tripping.
- Social: Matching vertical presets with appropriate bitrates and keyframe intervals (e.g., keyframe every 2 seconds).
Final Cut Pro: Efficient Setup for Speed
Final Cut Pro is optimized for macOS performance, fast ingest, and quick turnaround.
- Library and Media:
- Decide on Storage Locations: Keep media in library (portable) or external (flexible for teams).
- Create Smart Collections for quick filtering by keywords, ratings, or media type.
- Project Settings:
- Set resolution and frame rate based on delivery target at Project creation; avoid changing later to prevent render artifacts.
- Color Space:
- For standard web delivery: Rec.709.
- For HDR workflows: Wide Gamut HDR with careful export to SDR or HDR as needed.
- Proxies and Performance:
- Generate Proxies in ProRes Proxy or H.264 (Better Performance) at 50% resolution for smooth editing.
- Toggle Proxy Preferred in the viewer when working on heavy timelines.
- Roles and Audio:
- Assign Roles (Dialogue, Music, Effects) for organized mixing and easy stems export.
- Use Loudness Meter in FCP or third-party plugins for consistent web loudness.
- Export with Share Destinations:
- YouTube & Facebook preset for quick uploads, or
- Custom H.264/H.265 with controlled bitrate: 10–20 Mbps for 1080p, 35–60 Mbps for 4K, AAC 320 kbps.
- For mastering: ProRes 422 HQ or ProRes 4444 with alpha for graphics-heavy content.
Color Management and Gamma Considerations
Color inconsistencies between viewers, browsers, and devices can derail your final look:
- Work in Rec.709 Gamma 2.4 for a balanced SDR baseline. Many web players assume this gamma.
- If your footage is log, apply the correct camera LUT or use color-managed transforms instead of random LUTs to maintain midtone integrity.
- Avoid double transforms: Don’t apply both a camera LUT and a color-managed input transform simultaneously.
- Check your video in multiple players (VLC, QuickTime, web previews) to validate gamma and saturation.
Editing Workflow: Best Practices for Both NLEs
- Ingest and Organization:
- Keyword/tag your clips and create bins/events: A-roll, B-roll, VO, SFX, music, titles.
- Rough Cut → Fine Cut:
- Start with story structure and pacing; only then refine transitions, motion graphics, and fine-grain color.
- Effects and Titles:
- Keep transitions purposeful; overuse distracts viewers.
- Ensure motion graphics are rendered at timeline resolution with appropriate motion blur.
- Audio Polish:
- Remove hums and noise with gentle NR; avoid over-processing that introduces artifacts.
- Duck music under dialogue using automation to maintain intelligibility.
- QC Checklist Before Export:
- Check for clipping highlights and crushed shadows using scopes.
- Verify titles are within safe margins and legible on mobile.
- Confirm audio peaks don’t exceed -1 dBFS; aim for consistent perceived loudness.
Export Settings: Platform-Ready Delivery
Optimized exports reduce re-encodes and preserve detail.
- Codec Choice:
- H.264 High Profile for compatibility and small file sizes.
- H.265/HEVC for higher efficiency at similar visual quality (ensure platform support).
- ProRes/DNxHR for masters or further color/grading passes.
- Bitrate Targets:
- 1080p: 10–20 Mbps (CBR or 2-pass VBR).
- 4K: 35–60 Mbps (prefer 2-pass VBR for detail retention).
- Keyframe Interval:
- Set GOP to 2 seconds (e.g., 48–60 frames at 24–30 fps) for better streaming compression.
- Color and Levels:
- Export in Rec.709 with full metadata; ensure legal range where required by broadcasters.
- Audio:
- Stereo AAC 320 kbps, 48 kHz. For broadcast, export PCM WAV at 24-bit, 48 kHz.
Archiving and Versioning
Future-proof your projects and enable revisions without quality loss.
- Save a high-quality master (ProRes 422 HQ or DNxHR HQX).
- Export clean versions without captions/graphics when you anticipate localized reversioning.
- Keep project files, LUTs, fonts, and third-party plugins documented to avoid relink issues.
- Maintain a changelog and semantic versioning (e.g., v1.2.0) for client-facing deliveries.
Troubleshooting Common Issues
- Choppy Playback:
- Generate proxies/optimized media; lower timeline resolution during edit.
- Washed-Out Colors on Web:
- Confirm Rec.709 Gamma 2.4 workflow; avoid duplicate transforms; test in multiple players.
- Banding in Gradients:
- Add subtle grain or dither; export at higher bitrate or 10-bit if supported.
- Export Too Large:
- Use 2-pass VBR and slightly lower bitrate; consider HEVC; maintain keyframe every 2 seconds.
By aligning your timeline settings, color management, and export presets to your delivery goals, you’ll produce polished, platform-ready videos from either DaVinci Resolve or Final Cut Pro. Invest a few minutes upfront to define specs, build a proxy-friendly workflow, and standardize your exports—your viewers (and your CPU) will thank you.