
Choosing the right dash cam and installing it correctly can dramatically enhance your driving safety, protect you in case of accidents, reduce insurance disputes, and even deter theft. With a crowded market full of features—4K recording, parking mode, GPS, Wi‑Fi, cloud backup—it’s easy to feel overwhelmed. This comprehensive, SEO-optimized guide breaks down how to select the best dash cam for your needs, how to install it properly (with both DIY and professional options), and how to maintain it for reliable, long-term performance.
Why a Dash Cam Matters
A dash cam serves as an impartial witness. In the event of a collision, it can provide timestamped, geotagged evidence that protects you from false claims. For rideshare drivers, fleet operators, and daily commuters, it’s a modest investment that can save time, money, and stress. Modern dash cams also add driver-assistance benefits through lane-departure alerts, speed warnings, and incident detection.
Key Factors When Choosing a Dash Cam
- Video Resolution and Sensor Quality
- Aim for at least 1080p (Full HD); 2K (1440p) or 4K (2160p) delivers clearer license plates in varied lighting.
- Look for wide dynamic range (WDR) or HDR for night driving and shadow/highlight balance.
- A high-quality sensor (e.g., Sony STARVIS) improves low-light clarity.
- Field of View (FOV)
- 130°–160° FOV is ideal. Wider angles capture more lanes but can distort edges; excessively wide FOVs may reduce plate legibility.
- Single vs. Dual vs. Three-Channel
- Single (front-only): Budget-friendly and simple.
- Dual (front + rear): Best value for full coverage; critical for rear-end incidents.
- Three-channel (front + interior + rear): Ideal for rideshare and taxis, capturing passengers and activity inside the cabin.
- Parking Mode and Power Options
- True parking mode triggers on motion or impact when the vehicle is off.
- Requires constant power via hardwiring, OBD-II adapters, or a dedicated battery pack to avoid draining the car battery.
- Buffered recording retains seconds before and after an event for context.
- GPS and Speed Stamp
- Built-in or external GPS adds location and speed data to footage—helpful for insurance and trip logs.
- Ensure the option to toggle speed stamps off for privacy.
- Storage and File Management
- Use high-endurance microSD cards (e.g., 128GB–256GB) optimized for constant write cycles.
- Loop recording overwrites oldest files when space is full; lock events to prevent overwrite.
- Check max supported card size to plan retention times.
- Connectivity and Apps
- Wi‑Fi/Bluetooth enables quick file transfer without removing the card.
- Cloud upload (where available) adds offsite backup and remote alerts.
- Desktop viewers can sync GPS data with maps for precise incident reconstructions.
- Build Quality and Heat Resistance
- If you park in the sun, choose a model rated for high temperatures and with supercapacitors (more heat-tolerant than lithium batteries).
- Audio and Microphone
- Built-in mics capture context like horn use or conversations; ensure there’s an easy mute toggle for compliance with local privacy laws.
- Price and Warranty
- Budget models deliver basics; mid-range often offers best value; premium adds advanced ADAS and cloud.
- Look for reputable brands with firmware support and a two-year warranty where possible.
Legal and Privacy Considerations
Dash cam regulations vary:


- Windshield placement: Some regions limit mounting in the driver’s line of sight. Place behind the rearview mirror when possible.
- Audio recording: Rules may require consent to record passenger audio. Use the mic toggle when needed.
- Public sharing: Avoid posting identifiable people or plates without consent.
Check your local laws before installing and using a dash cam.
Step-by-Step Installation (DIY)
- Plan the Mounting Position
- Clean the glass with alcohol wipes.
- Position the camera high and centered, typically behind the rearview mirror to minimize distraction and maximize visibility.
- Attach the Mount
- Most dash cams use 3M adhesive mounts; they’re more stable than suction cups in heat and over time.
- Press firmly for 30–60 seconds; let adhesive cure for a few hours if possible.
- Route the Power Cable
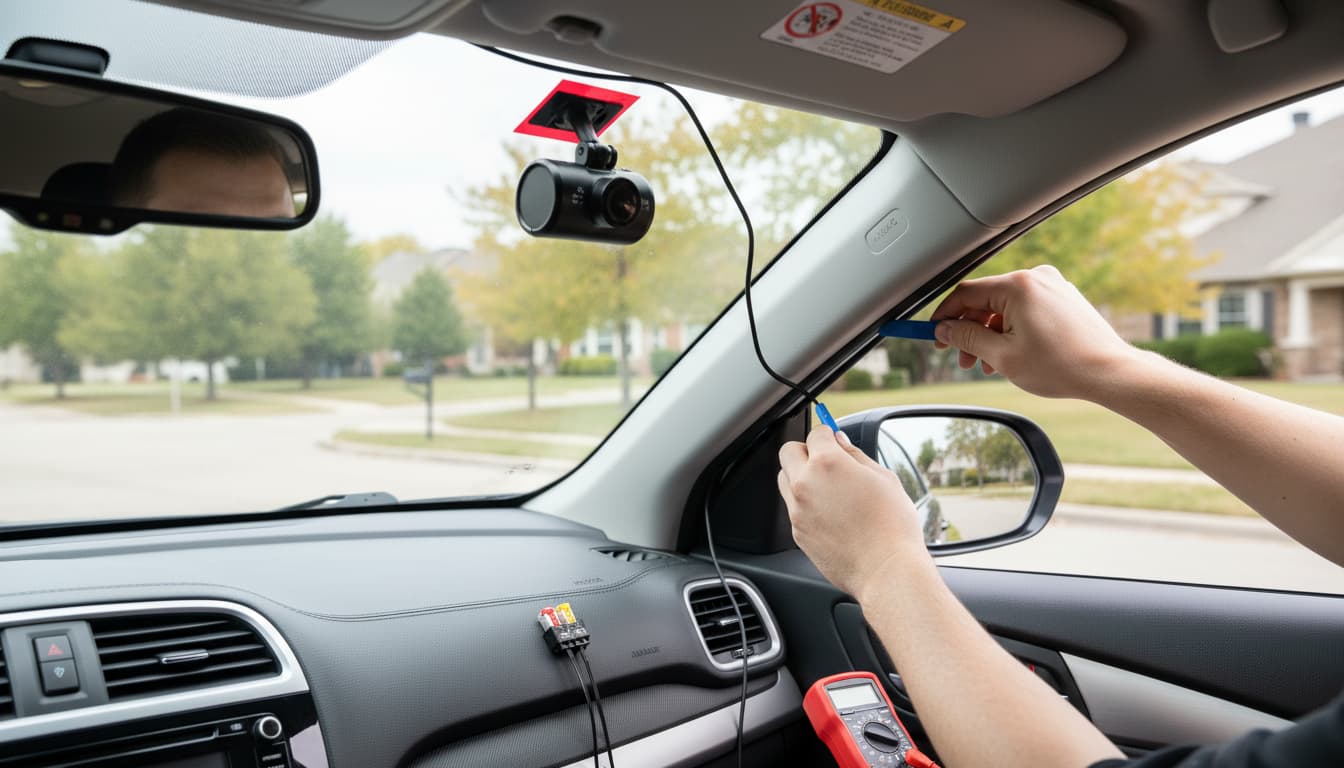
- Tuck the cable into the headliner, down the A-pillar (avoid interfering with airbag deployment zones), and along the door seal to the glove box or center console.
- Use trim tools to avoid damaging panels.
- Power Options
- 12V Socket: Fastest, no tools. Cables are visible and parking mode won’t work unless your socket is always on.
- Hardwire Kit: Connects to the fuse box for a clean install and active parking mode. Choose:
- ACC fuse: Powers on with ignition.
- Constant fuse: Provides always-on power for parking mode.
- Ground: Secure to a metal bolt.
- OBD-II Adapter: Simpler than a fuse tap, often supports parking mode. Check compatibility.
- Use a Hardwire Kit with Low-Voltage Cut-Off
- Protects your car battery by cutting power if voltage drops below a set threshold (e.g., 12.0V–12.2V).
- Set parking mode sensitivity to avoid false triggers from rain or passing shadows.
- Rear and Interior Cameras
- Run the rear camera cable along the roof liner to the trunk, following existing wiring channels.
- For hatchbacks, allow extra slack at the hinge to prevent strain.
- For interior IR cams, verify alignment to cover the cabin without violating privacy.
- Insert and Format the microSD Card
- Format in-camera for best compatibility.
- Enable loop recording and set bitrate/resolution based on card size and desired retention.
- Configure Settings
- Set time zone, GPS, speed stamp, driver alerts, and motion sensitivity.
- Turn on buffered parking mode if available.
- Update firmware before regular use.
- Test the Setup
- Start the car, verify recording indicators.
- Drive and review footage for angle, glare, and vibration.
- Night test: Check plate readability and exposure.
- Cable Management
- Secure loose sections with adhesive cable clips.
- Ensure no cables obstruct airbags or driver vision.
When to Choose Professional Installation
- You want a stealthy, OEM-like finish.
- Your vehicle’s electrical system is complex (luxury or EV models).
- You need multi-channel hardwiring with external battery packs.
- You prefer warranty-safe installation and documentation.
Certified installers can integrate power neatly and set up advanced parking modes without triggering error codes.
Maintenance and Best Practices
- Reformat the microSD card monthly to prevent file system errors.
- Replace high-endurance cards every 12–24 months, depending on usage.
- Keep the lens clean; fingerprints and dust degrade clarity.
- Review critical clips after incidents and back them up immediately.
- Enable event lock buttons or G-sensor locking to preserve important footage.
- Monitor thermal performance in summer; consider a sunshade or parking in the shade.
Troubleshooting Common Issues
- Camera not powering on: Check fuse tap orientation, ground connection, and low-voltage cut-off thresholds.
- Audio distortion: Reduce mic gain if available, or reposition to minimize wind noise.
- Poor night footage: Increase exposure or bitrate; consider a camera with a better sensor or WDR.
- Glare/reflections: Use a CPL filter if offered; adjust angle and remove dashboard reflective items.
- Constant false parking alerts: Lower motion sensitivity or use impact-only triggers.
Security and Data Practices
- If your dash cam uploads to the cloud, use strong, unique passwords and 2FA where available.
- Regularly update firmware to patch vulnerabilities and improve stability.
- Be mindful of data retention policies and local privacy laws.
Buying Checklist
- Resolution: 2K or 4K preferred for plate clarity.
- Channels: Dual for front/rear protection.
- Parking Mode: Buffered, with reliable power solution.
- Power: Hardwire kit + low-voltage cut-off or OBD-II adapter.
- Storage: High-endurance microSD, 128GB+.
- GPS: For speed/location stamps (toggleable).
- Heat Resistance: Supercapacitor-based preferred in hot climates.
- Support: Solid warranty, active firmware updates, responsive support.
A well-chosen, properly installed dash cam is a smart, long-term safeguard for every drive. Prioritize sensor quality, dual-channel coverage, robust parking mode, and reliable power. Whether you install it yourself or hire a professional, careful setup and maintenance will ensure your dash cam delivers clear, court-ready evidence whenever you need it.